


Brighten up your cold winter days with some refreshing blood orange citrus bars. The tangy and sweet treats are the perfect bite when you need that sweet pick-me-up.
Tangy And Sweet Blood Orange Citrus Bars
Baking in the winter with fresh produce isn't always as easy as it is in the summer. Summer is overly generous when it comes to stone fruit and berries. The one exception in the winter? Citrus fruits, specifically blood oranges.
Blood oranges are my favorite winter fruit. They are sweet, yet tart and have such a strong red color. The only downside to the citrus fruit is that they have such a limited season. They start to come around at the very end of December and stay through mid-April. While they are around till mid-April, they are really at their peak in the middle of the winter. The tail end of January and February is prime blood orange season. If you've never had one, definitely buy one and try one out for yourself right around now, they are delicious.
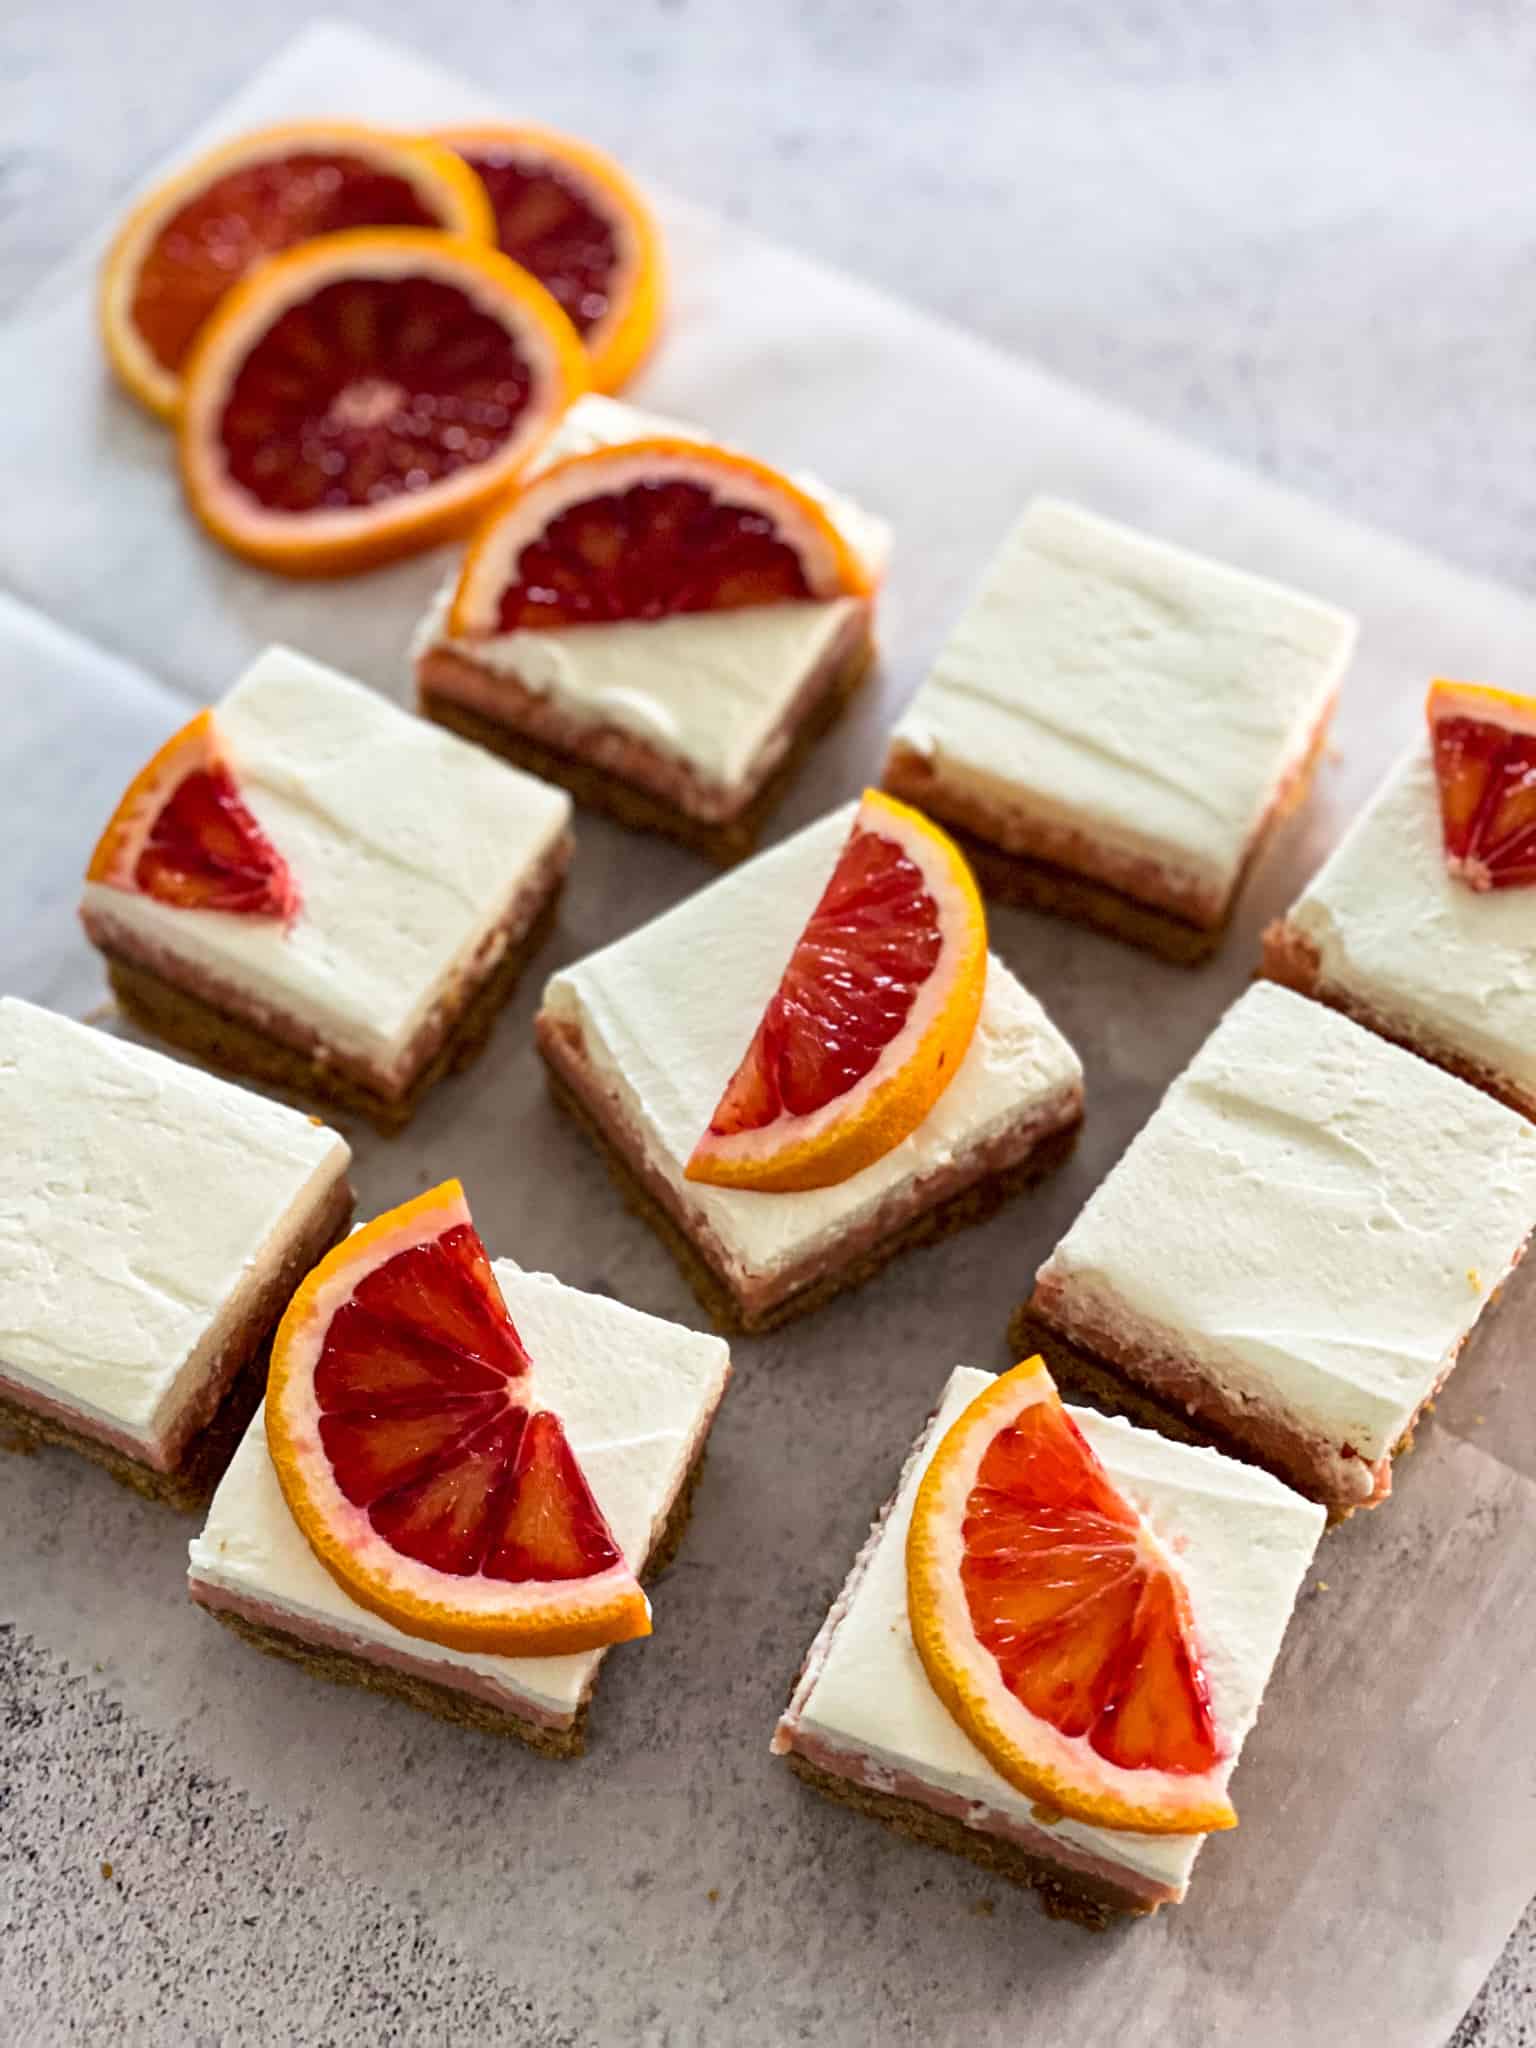
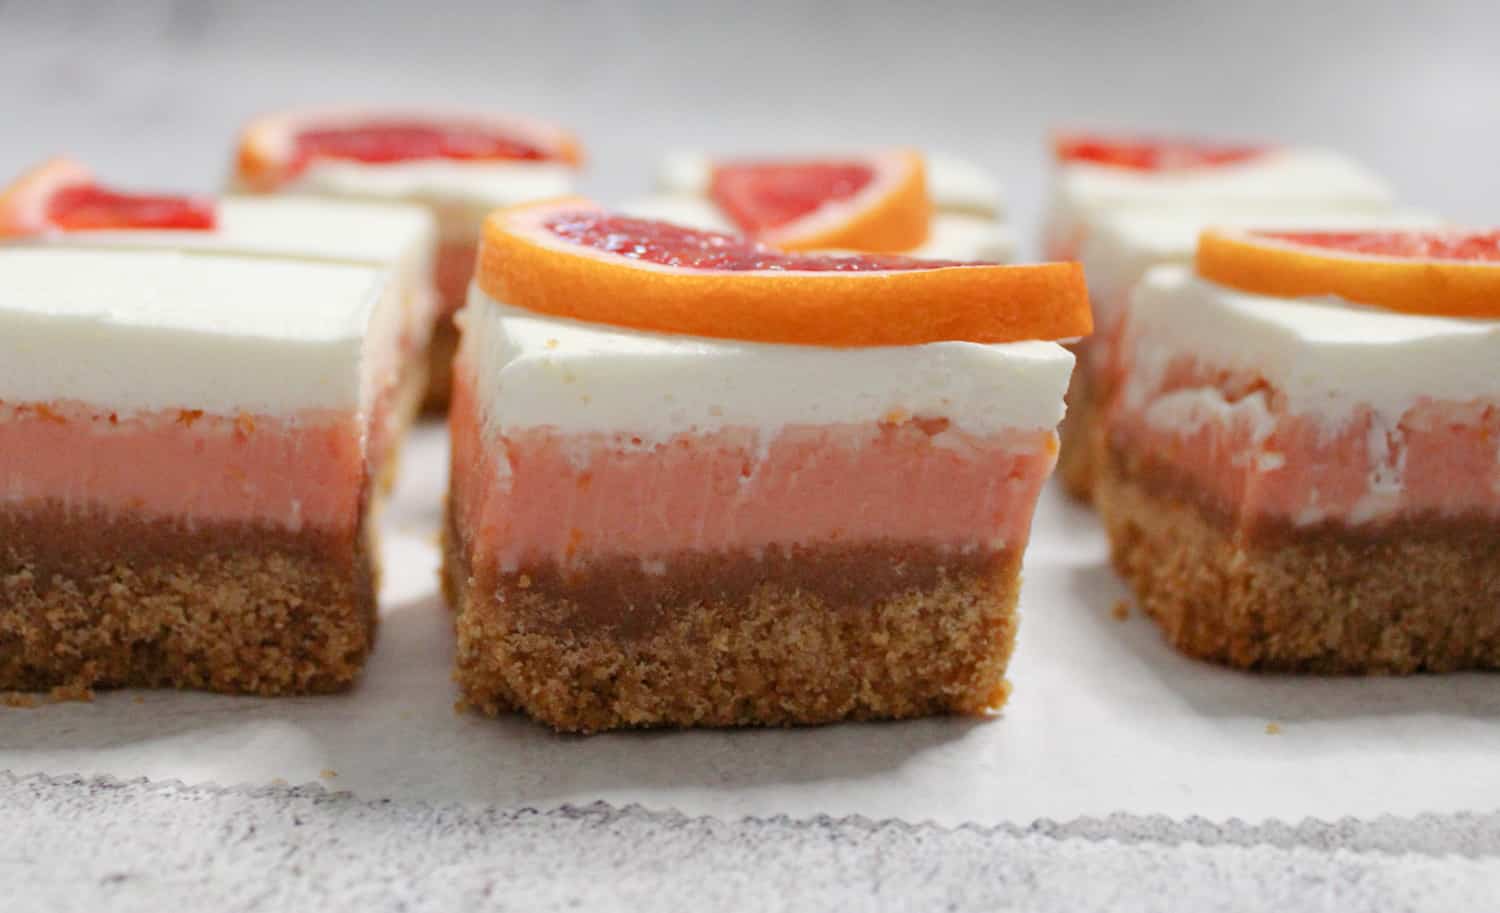
With blood oranges being in their prime, it only made sense to put them in a baked good. Last year, I was all about these blood orange shortbread bars. They are tangy with a buttery crust and basically taste like a melted creamsicle. This year I wanted to give a seasonal twist to the key lime pie bars I made over the summer. The blood orange citrus bars are basically a bite-sized version of key lime pie. They have a Nilla wafer, graham cracker crust, a citrus curd filling, and a heaping layer of fresh whipped cream.
Blood Orange Citrus Bar Recipe
To give it a seasonal upgrade, I swapped out the lime curd for blood orange curd. I also adjusted the crust recipe just a bit with a little more butter to give it a slightly better hold. Otherwise, it all stays the same. What I love about this recipe is that you can adjust it for any season with any type of curd. Go for lemon, grapefruit, or even cranberry. Basically, any fruit will work.
The only downside is these bars don't last very long. The curd and the whipped cream don't really freeze well. Also, because of the fresh ingredients they only last a few days in the fridge. This really shouldn't be a problem though because they are delicious and I don't really see how you would really have a ton of leftovers, to be honest.
Ingredients For Blood Orange Citrus Bars
Crust
- Vanilla wafer cookies
- Graham cracker
- Melted butter
Blood Orange Curd
- Cream cheese
- Eggs
- Sweetened condensed milk
- Blood oranges, both zest, and juice
Whipped Cream
- Heavy whipping cream
- Vanilla
- Powdered sugar
How To Make Blood Orange Citrus Bars
- Prepare: Preheat the oven to 350 and prepare an 8x8 baking dish with parchment. Set to the side.
- Make The Crust: In a food processor, blend the vanilla wafers and graham crackers until they are at a sandy texture. Once crushed, slowly add in the melted butter. The texture should hold together but still have a sandy feel to it. Push the cookie mixture into the prepared pan and firmly press until the crust is flat. Place the crust in the oven for 10-15 minutes, or until it turns a golden brown.
- Make The Filling: In a medium-sized bowl with a hand mixer or in the bowl of a stand mixer with a paddle attachment, whip the cream cheese until it is fluffy. Add in the egg yolks one at a time and beat until combined. Mix in the sweetened condensed milk, blood orange juice, and zest until fully combined. Pour the mixture over the crust and place the back in the oven for 16-18 minutes.
- Make The Whipped Topping: While the bars are baking, make the whipped topping. In a medium-sized bowl or in a bowl of a stand mixer, beat the heavy cream until bubbles start to form. When the bubbles form, increase the speed of the mixer and beat the cream until peaks start to form. When the peaks start to form, add in the powdered sugar and vanilla. Fold in more sugar until peak sweetness is reached.
- Assemble The Bars: Let the bars cool for 30 minutes and top them with whipped cream. Place the bars back in the refrigerator to chill for at least an hour or overnight.
- Cut: When the chilling is complete, cut the bars into small squares and enjoy.

FAQs
The blood orange citrus bars do not last super long so eat them up while they are fresh! They should last 3-4 days and should be kept in the fridge.
Unfortunately, the blood orange citrus bars do not freeze well. The citrus mixture is better fresh so it's best to eat the bars 2-3 days after they are made.
Yes! Any citrus fruit is great in the mixture. Try it with lemons, key limes, or grapefruits for a more tangy bar.
Get the details on the blood orange curd below and get ready for a winter bake!

Blood Orange Citrus Bars
Course: DessertCuisine: SeasonalDifficulty: Medium4
servings1
hour4
hoursMake these in the winter for a peak blood orange flavor.
Ingredients
- Crust
2 cups crushed vanilla wafer cookies
1 cup crushed graham crackers
7-9 tbsp melted butter
- Blood Orange Curd
4 oz cream cheese, softened
4 large egg yolks
14 oz sweetened condensed milk
zest of blood orange
½ cup blood orange juice (1-2 blood oranges)
- Whipped Cream
1-pint heavy whipping cream
1 tbsp vanilla
4- 6 tbsp powdered sugar
Directions
- Preheat the oven to 350°F. Prepare an 8x8 baking dish with parchment and set aside.
- In a food processor, blend the vanilla wafers and graham crackers until they resembled a sandy texture. Once combined slowly add the 7 tablespoon of the melted butter. The cookies should come together, but still be sandy. Add the additional butter if the crust mixture isn't sticking together.
- Add the cookie mixture to the pan and press firmly to form an even crust. You can do this using the bottom of your palms, or with an additional piece of parchment. You want the crust to be flat and even. Place the pan with the crust in the oven while you make the filling. The crust should cook for about 10-15 minutes and should start to turn a golden brown.
- Make the filling. In a medium-sized bowl or in the bowl of a stand mixer, whip the cream cheese until it is fluffy, about 3-4 minutes. Add the egg yolks and beat until combined. Next, add in the sweetened condensed milk, blood orange zest, and blood orange juice. Beat all ingredients together until combined. Pour the mixture over the crust and place it back in the oven. Bake the bars for about 16-18 minutes, or until the edges of the bars start to turn a golden brown.
- While the bars are baking, make the whipped cream. In a medium-sized bowl or in the bowl of a stand mixer, add the heavy whipping cream. Beat on low until bubbles start to form, then increase the speed of the mixer to medium-high. Beat the mixture until stiff peaks start to form. Once the peaks are formed, add in the vanilla and half of the powdered sugar. Beat for about another minute, or until your desired texture is formed. Gradually fold in the remaining powdered sugar until the desired sweetness is reached. Place whipped cream in the refrigerator to chill until needed.
- Once the bars are cooled, let them cool completely, for about 30 minutes. Once they are completely cool, place the bars in the refrigerator to chill for 2 hours. You can also chill the bars overnight.
- Once the chilling process is complete, add the whipped cream. You may have to mix the whipped cream for a minute or so if it falls during the chilling process. Top bars with a heaping spoonful of whipped cream and smooth until flat. Place the bars back in the fridge to chill for an hour.
- Once the chilling is complete, take the bars out and cut them into small squares. Store the bars in an air-tight container in the fridge. They should last for about 1 week.
Notes
- Zest the blood orange before you juice them. It will be much easier.


Cathy Rikhye says
These look amazing!!
Ellen says
Yum! Such a beautiful picture too